Tuesday 31 January 2017

5 DIYs To Try | January 2017


This year, I want to share some of the DIYs and Crafty Websites that have inspired & caught my eye over the last month - add them with me to your list of things to try!  Here's 5 DIYs from January to try:

I mean, EVERYONE should have this in their home / by their bed / in the office.  Full DIY and more here. [Technically written in December, but huge exception as it is so ace].

I love papercrafts and these cake toppers look store bought - you can customise to your colour preference and use for any event.  They'd look great supersized and framed as colourful art work too! Full DIY and more here.

Stylish, simple and so easy! I've got this bookmarked for my bathroom renovation project.  Find this and a huge treasure-trove of DIYS and style inspiration here.

Papercrafting and pretty home decor - right this way! 

HOLOGRAPHIC TYPOGRAPHY PENCIL CUP | A Kailo Chic Life
Sometimes, the best DIYs are simple, quick and stylish - this combines them all and this blog is my new favourite find! See the tutorial here.

Will you be trying any of the 5 DIYs?

[Don't forget to check out the TTSM January DIYS: Memory Jar, Mini Wire Grid Frame, Mermaid Slogan Jumper, Card Wallet & Marble Trinket Dishes]
Share:

Sunday 29 January 2017

DIY Home Decor | Marble Air Dry Clay Display Trays


I miss my Christmas decorations! Any one else feeling that their house is completely empty?
Hence another home décor DIY coming at you today - now there are no lights, sweets, cards and decorations taking up my table and cupboard space, I'm making stuff to take it's place and am bring you a DIY experiment.  I've seen so many marble polymer clay DIYs - but can it work with air dry? Let's find out.

| WHAT YOU NEED |
White Clay / Black Paint / Modge Podge / Glue Gun / Rolling Pin / Knife / Baking Paper

| HOW YOU MAKE THEM |
I tried two methods of marbling my clay - both equally as messy and, in truth, achieving similar results - so pick whichever you prefer!

METHOD 1
I divided my clay in half, keeping one half completely white and creating my marbled colour with the remaining.  I added a dot of black to the clay and mixed it in - not completely, but enough so that the paint had been absorbed.
I then combined the clay, twisting together a few times before flattening and then rolling to see the outcome.
Some areas were more marbled than others, and I could change the appearance with further rolling a little.
If you aren't happy with the effect, you can roll the clay back up and try again - bearing in mind that each time this is done, the colours will blend more and more and the marble effect will decrease [but this may be the effect you are after!].
To create a simple, rectangular tray, I used a ruler and knife to cut through the clay and then transferred on to baking paper to dry on:

METHOD 2
I simply added my paint to the clay and combined by folding the clay around and over it before rolling out to see the spread of the marble effect:

A little less patterned, but to add more, I added a few more dots of paint, folded the clay and then rolled again - a much darker marble effect was created with a wider spread:

 I then went for a smaller shape, creating a hexagon template from paper and used a knife to cut through the clay.
 Remove the excess and leave the clay to dry for at least 24 hours to ensure it is thoroughly dry.

To stop the clay from bending at the edges and keep the clay flat, ensure you turn the clay at regular intervals and when dry to touch [but not completely dried through] you can add an additional piece of baking paper on top with a book or something weighty to ensure the clay stays flat.
I did not do this.
I made my clay shapes and then went away for the weekend, coming back to a curled hexagon and twisted tray.  As a further experiment, I attempted to flatten them and it worked [unfortunately, so convinced it wouldn't, I didn't take photos].  However; adding the paint to the clay does change it structure and instead of becoming brittle and breaking, like air dry clay would normally, there was some give in the clay and with a little heat [sitting on top of the radiator for a while] and gentle increase of weight to flatten on top over the week, I have flattened trays.  Still can't quite believe it worked.
Remove any rough or marked edges with sandpaper to create a neat and smooth finish.
...and to protect the surfaces, I coated in Modge Podge:
To protect the surfaces they would sit on, I then added some easy DIY protectors.  Created from hot glue, added to a ruler so that they could be easily removed and then fixed in place with strong glue:
The trays are complete.  Use to hold and tidy away things:
Or as a pretty display tray:
The key to this DIY was less is more - it's much easier to add, whether more white clay or paint but impossible to take away - I'm really pleased with the overall effect and finish - something I can keep in mind for any future DIY projects.
Share:

Sunday 22 January 2017

DIY Accessories | Card Holder

For travel cards, debit/credit cards or gift cards, carry them around in this simple card holder [plus it it features glitter material, so......]

I am a bag lady - I have big handbags and carry the world in them, including a fairly large purse. But or quick trips to local shop, or for storing cards that I need quick access to [rather than rummaging through my bag and/or purse], I have a simple, little & glittery DIY.

| WHAT YOU NEED |
Glitter Fabric / Tape Measure or Ruler / Pins / Needle & Thread / Sewing Machine / Fabric Glue

| HOW YOU MAKE IT |

I created my own template [please feel free to use below] but I'll also talk you quickly through the very simple measurements I used and why if you want to create your own to accommodate more cards or a slightly different layout.
[right-click and save to your computer to print]

Using a debit card as my template, I marked the card size and added a further 0.5cm to one side and the bottom.  This would give a little wiggle room and allow for the thickness of the card, without straining the fabric.  I then added a 0.5cm seam to each side, the top and the bottom.
I reflected this pattern from the line that would be the bottom of the card holder.  To ensure that the card could be removed easily, I created a dip in the top line.
Use this template to cut your fabric.
If you are using a particularly thick material, the fold at the bottom may not sit neatly, so you can cut the template across the bottom so that two separate pieces are being sewn together.
Simply, sew from the top of one side down, across the bottom and up the other side with a running stitch [this can be done by hand or with a machine].
Leave the start and end of the stitch long so that it can be neatened by hand if using a machine.
Tie a secure knot [or two] with the two threads at the start of the stitch and then use a needle to thread these back in to the running stitch for a couple of stitches, finishing on the inside of the card holder.
Trim the thread and this will create a nice, neat finish.  Repeat on the other side.
Because this is vinyl/pvc fabric, the edges don't fray, but to create a neat and secure finish, I added a line of fabric glue around the seams and left to dry completely
[held in place with some small bull dog clips] before trimming the edges to neaten.
Use to store your cards, travel cards or make as a great way to hold someones gift card!
Share:

Sunday 15 January 2017

DIY Fashion | Slogan Jumper

I've attempted a few techniques for personalising jumpers [fabric paint and sequins] but this is by far the easiest and quickest way to customise or update your wardrobe.

| WHAT YOU NEED |
Jumper / Iron-on Letters / Pins / Tape Measure / Iron / Teatowel

| HOW YOU MAKE IT |

This is a really quick and easy make - once you have the slogan and positioning correct.  To do this, start by laying your letters spaced evenly in a line and measure the length.
Mark this on your jumper with pins.  Additionally, mark the centre of the jumper to ensure that your slogan is positioned correctly.
I wanted a slight curve to my slogan, so ensured that my side marks were of equal measure below the centre mark.
Space your letters out, adhesive side down and ensure that you are happy with the positioning.
[I bought my letters from eBay - there's a huge variety of colours, styles and sizes to choose from]

You're now ready to iron in place.  To protect your clothing, cover the letters carefully with a thin piece of material [a tea towel is perfect] and use your iron on a cotton setting [refer to the iron-on letter instructions] and hold and press over the letters for a few seconds at a time and repeat until the letters adhere to your fabric.
...and you are done! A fully customised item for your wardrobe, created in minutes.
Share:

Sunday 8 January 2017

DIY Home Decor | Mini Grid Wire Frame

I wasn't entirely sure what to call this DIY - its a desk tidy, frame, photo holder and general storage and display handy accessory for your desk, dressing table or any table top really.
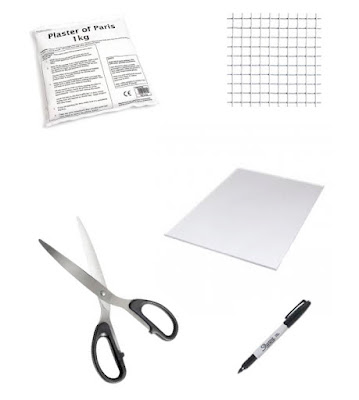
I needed another excuse to use plaster and I had plenty of left over wire from this wall grid DIY, so combined them both in what turned out to be a pretty easy make.

| WHAT YOU NEED |

| HOW YOU MAKE IT |
The creation from start to finish is quite quick, so the majority of this make is shown via video - literally no time to take photos as once that plaster is mixed, you go!


Start by creating a mould for the base/stand [please feel free to use the template below - right click the image and save to your computer to print].
A Perspex sheet works perfectly for this - it keeps it shape and can be assembled with plenty of tape to make it secure and water-tight.  To keep the edges at 90 degrees, I cut the template sections separately, which meant they could be easily placed, rather than bent, in to shape.
Now cut your grid wire to size, using the mould to determine the width [you want it to sit with a little space either side] and height.  Trim or bend any sharp edges to make sure that it is safe!

Once you have your mould and wire ready, gather a few weighty items which will be used to support your mould before mixing your plaster - as it dries quickly and won't be easy to add to once poured, make a generous amount to ensure you don't run out.
Pour your plaster into the mould, tap on the surface to remove any bubbles and leave for just a few minutes to settle.
Add your wire to the mould, slightly angled and hold everything in place with your weighty objects.
Leave to dry for at least 8 hours/overnight [but refer to your packet instructions].
Cut away the mould with scissors or a craft knife down the mould seams.
Your wire should now stand freely and the stand provide enough weight and support to keep it there.
...and your wire frame is complete!
I'm using mine on my desk to store and clip any receipts and notes and the stand is a handy store for keeping any small bits and bobs tidy.
This could be a great jewellery storage/display tidy, photo frame or note holder and can be personalised to any size that you would find useful.  Still really enjoying plaster [you can see my DIY photo holders and ring cones] - have you used it in any projects yet?
Share:
© The Things She Makes | All rights reserved.
Blog Design Handcrafted by pipdig